I will write how to programm ATmega32 with "Khazama AVR Programmer" and "USBASP"
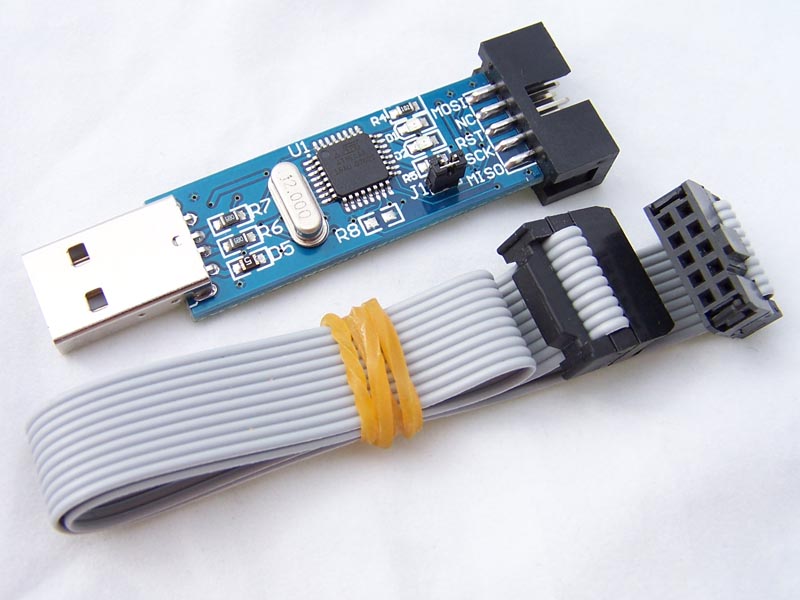
USBASP - it's a programmer which you can build yourself or buy (3$ on ebay).
Drivers and additional information available on the creator site

Khazama AVR Programmer - it's a programm which uploads .hex file in microcontroller.
At first we need to install USBASP driver which can be found in the link above.
After that we need to write code which will be controlling our AVR ( i use AVR studio )
Compile it, get .hex file, (which you can test in PROTEUS for example).
Now we need to connect programmer to microcontroller, we will need only 6 pins from USBASP, (if there is 10 pins, then 3, 4, 6 and 8 pins are not used).

It's better to use multimeter, to test if your programmer has the same pinout.
 When you know your pinout you need to connect USBASP to microcontroller using datasheet, in microcontroller datasheet will be written it's pinout and some of the pins will have the same names as USBASP, (MOSI, SCK and so on), VTG = +5 V (VCC), NC = not connected, also it may be that only 1 of GND pins is really connected to ground, so it's better to check for sure.
After that we need to open Khazama AVR Programmer and check if he can see our microconftroller, for that we need to select our AVR controller in the drop down menu "AVR:", after that press command -> read chip signature. If there is no errors, then everything is working fine.

Also you can use "eXtreme Burner- AVR" or "AVRDUDE" instead of Khazama...
Now we need to show him where is our .hex file, for that press File -> load flash file to buffer, choose correct file and press OK.
If you need to change fuses, you need to press Command -> "fuse and lock bits" or CTRL + A. About fuse bits i wrote Here.
Now press LOAD and fuses will be loaded from MC.

Check means that bit is NOT set, the same way as in ATMEL datasheets, empty box means that bit IS set. As you see in my MC internal RC generator on 8 Mhz is already set, it was hte only thing i would like to check, so i will leave everything as it is.
Write all - writes all fuses to MC.
Now press cancel and auto programm.
That's all, MC is getting his power from USBASP and starts working instantly.
If you have error "error setting usbasp isp clock" , then it's not so bad, you can still programm your MC, but you will have to press OK many times, because of that i started using "eXtreme Burner- AVR".

This error happens because USBASP sets ISP clock itself and Khazama can't change it, reprogramming USBASP may fix it.
USBASP - it's a programmer which you can build yourself or buy (3$ on ebay).
Drivers and additional information available on the creator site
Khazama AVR Programmer - it's a programm which uploads .hex file in microcontroller.
At first we need to install USBASP driver which can be found in the link above.
After that we need to write code which will be controlling our AVR ( i use AVR studio )
Compile it, get .hex file, (which you can test in PROTEUS for example).
Now we need to connect programmer to microcontroller, we will need only 6 pins from USBASP, (if there is 10 pins, then 3, 4, 6 and 8 pins are not used).
It's better to use multimeter, to test if your programmer has the same pinout.

After that we need to open Khazama AVR Programmer and check if he can see our microconftroller, for that we need to select our AVR controller in the drop down menu "AVR:", after that press command -> read chip signature. If there is no errors, then everything is working fine.
Also you can use "eXtreme Burner- AVR" or "AVRDUDE" instead of Khazama...
Now we need to show him where is our .hex file, for that press File -> load flash file to buffer, choose correct file and press OK.
If you need to change fuses, you need to press Command -> "fuse and lock bits" or CTRL + A. About fuse bits i wrote Here.
Now press LOAD and fuses will be loaded from MC.

Check means that bit is NOT set, the same way as in ATMEL datasheets, empty box means that bit IS set. As you see in my MC internal RC generator on 8 Mhz is already set, it was hte only thing i would like to check, so i will leave everything as it is.
Write all - writes all fuses to MC.
Now press cancel and auto programm.
That's all, MC is getting his power from USBASP and starts working instantly.
UPDATE
If you have error "error setting usbasp isp clock" , then it's not so bad, you can still programm your MC, but you will have to press OK many times, because of that i started using "eXtreme Burner- AVR".
This error happens because USBASP sets ISP clock itself and Khazama can't change it, reprogramming USBASP may fix it.


For windows 8 you will need a signed driver. Protostack has one on http://www.protostack.com/accessories/usbasp-avr-programmer
ReplyDeleteThank you for the info.
DeleteGood
ReplyDelete