This guide will explain how to recompile U-Boot, in order to add FPGA configuration bin file in BOOT.bin.
In order for FSBL to configure the FPGA at power up and before starting Linux, it must be added to the boot file immediately after FSBL, otherwise it will not find it. It is necessary to use the * .bit file. Because in the * .bin file there is no header and it does not start via FSBL. Boot.bin looks like this:
Thursday, August 15, 2019

Tuesday, August 6, 2019
Embedded Linux on Zynq, how to transfer files from a computer to Linux
How to run Linux on Zynq was described here.
By default, to transfer files to the Linux kernel from Xilinx, you can use several methods, which are described on their wiki: xilinx-wiki.atlassian.net.
Files can be transferred to the working system both via the Ethernet port and via the USB (UART) port. But since the file system is in RAM, when the power is turned off, added files will disappear. To save them you will need to change the rootfs file system. First, let's try transferring files via ethernet.
By default, to transfer files to the Linux kernel from Xilinx, you can use several methods, which are described on their wiki: xilinx-wiki.atlassian.net.
Files can be transferred to the working system both via the Ethernet port and via the USB (UART) port. But since the file system is in RAM, when the power is turned off, added files will disappear. To save them you will need to change the rootfs file system. First, let's try transferring files via ethernet.
Wednesday, July 24, 2019
How to compile Linux for Zybo (Zynq) development board and start it from QSPI
This article will describe how to prepare all the necessary files to run Linux from the Xilinx FPGA, namely the Zybo debug board. With the subsequent writing of the necessary files on QSPI and the launch of the finished system.
This article is based on the following guides:
instructables.com, xilinx-wiki.atlassian.net, github.com.
FPGA development will be done in Vivado 2019.1, The necessary files for Linux will be compiled in a virtual machine Oracle VM VirtualBox, on which Ubuntu is installed.
Compilation will take place without PetaLinux, which, as Xilinx claims is a platform that contains everything you need to run Linux on FPGA and makes it easy to make changes. In this manual however, everything will be assembled manually, in order to take a closer look at the work of embedded systems.
This article is based on the following guides:
instructables.com, xilinx-wiki.atlassian.net, github.com.
FPGA development will be done in Vivado 2019.1, The necessary files for Linux will be compiled in a virtual machine Oracle VM VirtualBox, on which Ubuntu is installed.
Compilation will take place without PetaLinux, which, as Xilinx claims is a platform that contains everything you need to run Linux on FPGA and makes it easy to make changes. In this manual however, everything will be assembled manually, in order to take a closer look at the work of embedded systems.
Monday, September 29, 2014
Working with BMP file C++ convert image in to an array
I described insides of the BMP file Here.
I needed a program which converts bmp image in a 2 dimensional array of 0 and 1. So i could display the image on the LCD display from Nokia 5110.
Here I have the source code, written in C++, now i will explain how it works.
int main(int argc, char *argv[])
How the BMP (bitmap) image looks from the inside, in binary
I needed to create a mitmap image in to code converter for Nokia 5110 display. So i decided to use .bmp images, just because they are simple.
If you want to look inside image file (binary code) you can use any "hex editor", if you open any file, programm will display to you hexadecimal codes from which this file consist of. I use "Hex Editor XVI32"

Sunday, September 28, 2014

Saturday, September 27, 2014
Working with LCD display on HD44780 AVR


How to work with AVR MC pins and their additional functions
I will write an overview about different AVR ATmega8 pins and show some coe examples for working with tem.

Friday, September 26, 2014
PC games I've made with SDL and C++
Long time ago i decided to teach myself how to make computer games. So here i will show what games i created.
All games written on c++ with SDL library, some of them have source code, too bad I don't have source code for all of them.
Horizontal shooter

The first semi-game i have ever made, i wanted everything in it, so it was never finished, moreover when it was working CPU usage was 100% and RAM was fille with garbage.
Media Tech MT1501 gamepad wireless driver
Gamepad driver, I am afraid to lose the disc. So i will keep it here.

Media Tech MT1501 gamepad wireless driver
https://drive.google.com/file/d/0B57Rnj-YfbQFanVmaGhLYnllbEU/edit?usp=sharing

Media Tech MT1501 gamepad wireless driver
https://drive.google.com/file/d/0B57Rnj-YfbQFanVmaGhLYnllbEU/edit?usp=sharing
Tuesday, August 19, 2014
What is a servo motor (servo)
Servo motor is a motor, which we control by telling it at what angle it should be rotated and servo is trying to maintain that position.
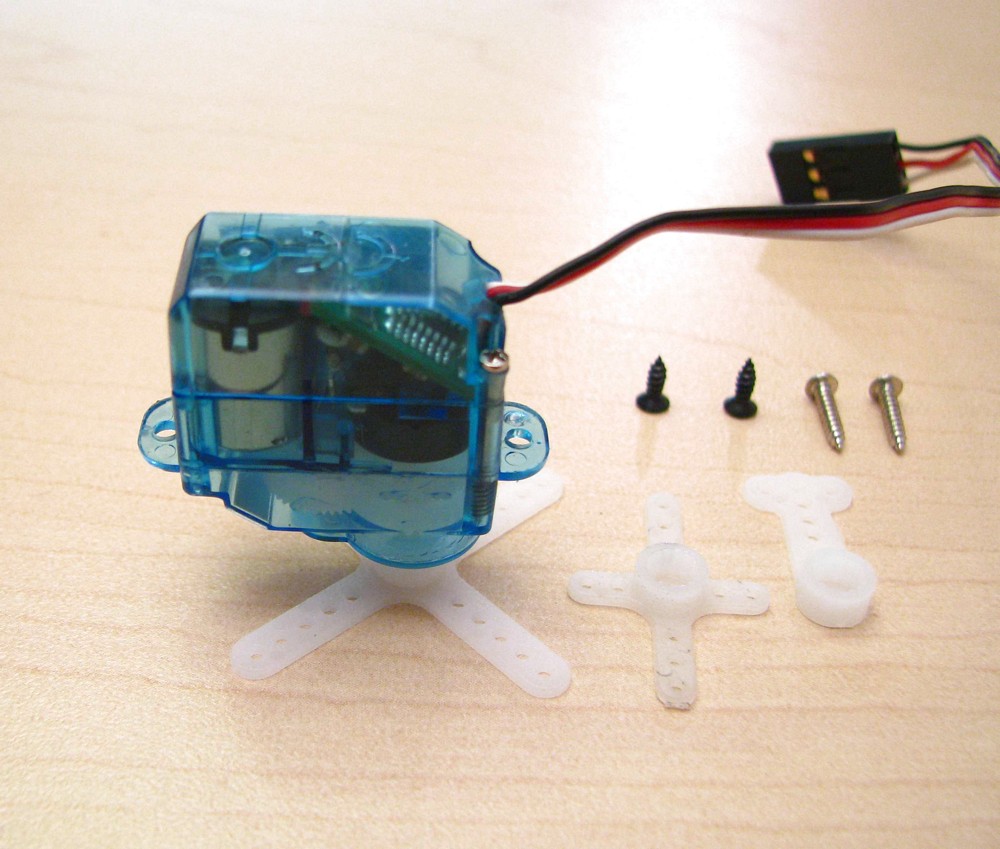
How to work with it
Servo has 3 outputs: Power, Ground and Data.
On Data wire we apply PWM signal with different duty cycle, to control our motor.


There are a variety of different servos, so you still need to read datasheet, but this information will help you to start.
Now i will write about their structure, you don't need to know what is inside of them to use them.
How to work with Sharp Infrared sensor
I already wrote how to work with ADC In this article.

( In the simplest case ) Infrared Proximity Sensor - Sharp has 3 output pins: Vcc - Power, GND - Ground and Vo - Data. Depending on the distance varies the voltage at the output Vo, all that left is transform that data to digital information.
AVR Tutorial - ADC (Analog to Digital Converter)
ADC as you can guess converts analog voltage to digital number, so we could work with it in microcontroller. We can build simple ADC with comparator, it's a device which compares 2 signals (1 of them is some constant reference voltage) gives one otput if 1 signal is bigger and other if smaller.
ADC accuracy depends on it's resolution. e.g. if we have reference voltage = 5 V and our ADC is 10-bit, then on every bit we have 5 / ( 2^10 - 1 ) = 0.00489 or 5 mV, so we can't measure changes less than 5 mV.
Monday, August 18, 2014
Playing music on AVR with PWM
At first I tried to write code myself, but I failed many times.
So i searched for a working project and found it, AVR is using PWM and simple Piezo Buzzer.
Sources on Github
Introduction to Pulse Width Modulation (PWM)
PWM — Pulse Width Modulation
In general it's a method of controlling analog voltage by changing digital impulses width. In other words we can change analog signal with digitall signals.
In general it's a method of controlling analog voltage by changing digital impulses width. In other words we can change analog signal with digitall signals.

If we need to change LED brightness, we will connect it to the
variable resistor. If we need constant brightness we will compute our resistor, but still some of the power will be converted to heat on the resistor, well, it's not very efficient.
In addition we have to manually change resistance and sometimes that is impossible (RC cars).
variable resistor. If we need constant brightness we will compute our resistor, but still some of the power will be converted to heat on the resistor, well, it's not very efficient.
In addition we have to manually change resistance and sometimes that is impossible (RC cars).
Sunday, August 17, 2014
AVR Tutorial - PWM Signal Generation using Timers
In AVR microcontrollers PWM is implemented in hardware, all that left is configure it, by setting required bits in timer registers.
Saturday, August 16, 2014
How to calculate simple transistor switch. How to light LED in the dark
I needed to make LED light in the dark, so I found this video, where Ben Krasnow explains how to make a simple transistor switch.
AVR Tutorial - Introduction to Timers
Avr microcontrollers have several timers (counters). They can be 8 bit (max == 2^8 = 256), or 16 bit (max == 2^16 = 65536).
- Timers can count with different speeds and compute ticks
- Count from external oscillators
- With them we can compute time and time intervals (accuracy more than 0.5%)
- Generate ADC signals.
- Generate interrupts.
Friday, August 15, 2014
Servomotors practise, Servo Motor Control using AVR ATmega8
I had bought some chinese servomotors and decided to make a laser toy for my cat.

Subscribe to:
Posts
(
Atom
)

 Posts

